Filters in Wildlife Photography


As a landscape photographer (and now Youtuber), I use filters all the time. You may feel that filters, in these digital days are unnecessary. We no longer need UV filters to protect film or colour filters for black and white. Nor do we need warming and cooling filters - all of this can be taken care of in Photoshop.
However, there is still a case to be made for using Polarising, Neutral Density (ND’s) and HiLux filters for stills and Satins & ND’s for video. Moreover, there is a strong case to use them for wildlife photography - an arena in which they are seldom seen.

There are several reasons that we rarely see filters used in wildlife photography. The first is that things move fast and often we have no time to use a filter. Second, we may lose several stops of light (in a genre where light is at a premium) and third, they are rarely big enough to fit the end of a telephoto lens.

Canon 52mm drop-in polariser
You might not be aware that the large primes made by Canon, Nikon and Sigma all feature the capability to drop 52mm filters next to the camera mount. The standard Zoom lenses rarely have this capability.
More recently the new Canon RF mount to EF adapters include drop in polarisers and ND’s. Very handy because now we only need to carry one size of filter.
So we do have the ability to use filters for wildlife but one might still ask why?
Well to answer that question let’s talk about what it is that filters offer us.
First off, polarisers are one of the few types of filter that cannot be replicated in software. The reason for this is that they eliminate or reduce, reflections off shiny surfaces. It is absolutely astounding how much better foliage, feathers and fur look when polarised. There’s a considerable enrichment of colours, detail and contrast.
If we photograph water birds or subjects in or near water, polarisers are exceptional at removing the glare and reflection from the water’s surface or from wet fur and feathers.

Unprocessed image of foliage without Polarising Filter
Same shot with a Polarising Filter - note the reduced reflections and improved saturation
The cost of using a polariser is a stop or two of light.
Neutral Density filters on the other hand are very rarely used for wildlife and personally, I think that is a shame because they have a very useful characteristic.
Most of the time they are used to extend exposure time, particularly in landscape photography and in timelapse videography.
But they also have another crucial feature: They allow us to reduce depth of field in very bright conditions!
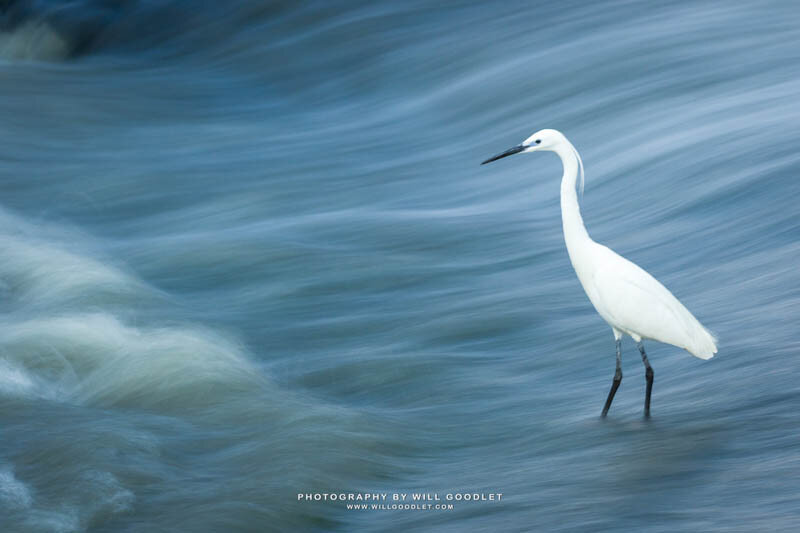
Photographed with a ND16 filter + polariser for +/- 5 1/2 stops loss of light
Quite often when trying to portray movement in our subjects, we simply stop the lens down. It’s not uncommon to have an aperture of f45 dialled in, in order to extend our exposure to 1/50th or 1/80th of a second in daylight.
We might use these settings for panning shots, relying on our movement of the lens to blur the background. If, however, the shot is static, then the background might well become exceptionally unsightly or cluttered due to our increased depth of field.
One way to fix this is with a Neutral Density filter. By darkening the exposure we can again shoot at wider apertures, achieving a narrow depth of field at the same time as we extend the exposure.
So, besides panning shots, what is this characteristic good for?
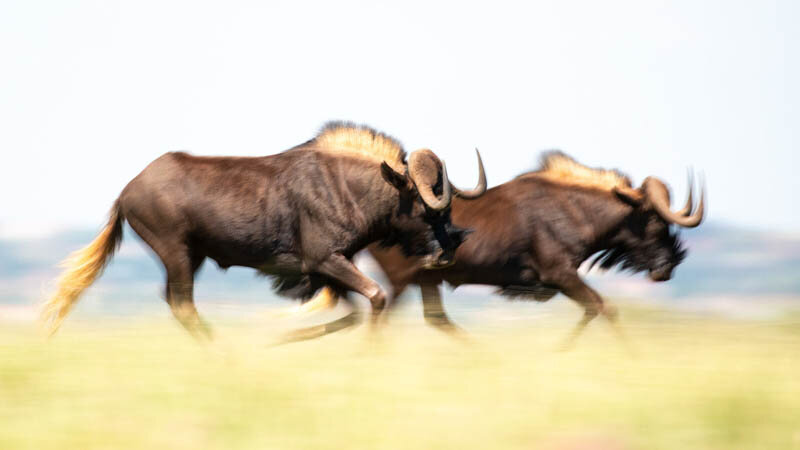
Well, it’s good for anything that contains both moving and static elements in the same frame. I’ve used it on fighting giraffe, stationary egrets and windblown foliage.

Photographed with a 6 stop ND filter + polariser
ND’s are also incredibly useful for shooting at wide angles with a wide aperture in broad daylight. It could very easily be true that we would be unable to capture a shot at f2.8 on a bright African day - even with an exposure of just 1/8000th of a second.
While it is great to have all of these filter options at our finger tips, there is one major fly in the ointment. Namely, that it is often the case that we can’t fit a filter to the end of our huge telephoto-zoom lenses.
For this reason, I am a huge fan of the Canon 100-400 and any other telephoto that will take a standard 77mm filter. You can buy filters up to a huge 105mm diameter, but they can become very expensive.

Step-up ring
77’s are great because they are usable across most pro lenses and even fit my medium format Mamiya RZ67 lenses.
Of course, it is usually preferable to buy a filter that is big enough to fit your largest (or planned largest) lens and then use cheap step-up rings to secure it to lenses with smaller diameters.
So, if your largest lens is 82mm, grab an 82mm filter and a 77-82mm step-up ring. This would allow you to use the same filter on all of your smaller 77mm lenses as well.
Subscribe on Youtube for more Photography Tips
Another option is to use a square filter kit. Cheap resin kits are made by Cokin and more expensive by companies like Lee Filters. This system has the benefit of being able to attach to most standard lenses as well as allowing the use of graduated neutral density filters, which, believe it or not, do have some applications for wildlife photography.
Of course, the downside to such a system is the bulkiness of the filters at the end of the lens and the added care one needs to take with them.
So why else would I recommend using filters? Well to answer that I suppose one has to think a little bit about the photo we aim to take.
Too often we see beautifully shot portraits of animals. Often all one needs is access to the animal at the right time of day, a telephoto lens and a right forefinger.

Just another shot of a beautiful cat.
It's always nice to see another big cat rendered in extreme detail but really, what does the image say? Is it still interesting and relevant? Does it tell us a story or expose some secret of its existence? Is the image artful or technically creative?
Most of the time, for my own photography, the answer is no.
It is most emphatically no when my right forefinger and excitement takes over and I'm left with 50 shots of exactly the same pose wasting time and space on my hard drive.
So what does make a compelling image? For me, it would revolve around a story, an atmosphere, a meaning or message, an interesting fact or aspect, or sometimes just a species I haven't seen or ever photographed before.
Usually there will be two or more components in the scene - often they will be dissimilar: light and dark, hunter and prey, good and evil, land and sky, orange and blue, stillness and movement, in focus and out of focus.

The story of a cat
If not then the image is most likely about action, emotion or an event. A running cheetah or roaring or angry lion, where the frozen action and technical precision presents the interest.
So I guess what I am trying to say that filters can help us to tell some of those stories.


